| Learn How to Trim Your Insoles3 Comments26 October 2016 | Alex You've found the perfect insoles for your needs, chosen your size and ordered from ShoeInsoles.co.uk – you've done everything possible to start your journey on the road to recovery, right? Unfortunately, you might still have one obstacle to overcome: fitting the insole to your shoe. Shoe sizes are not a precise science – everyone's been in that situation where a certain size in one shoe fits like a glove whereas the same size in another pair is far too tight. In the same way, an insole in size 9 from one brand might not be the same as a size 9 from another. With all of this confusion, you might be wondering "How do I get the perfect insoles for my shoes?" The answer is simple: trimming! What is Insole Trimming?Insole trimming involves customising your insoles at home to ensure that they've got the correct level of fit for a specific pair of shoes. It is a simple process and can be done with products found in the average home – all you need are a pen and a pair of sharp kitchen scissors! By trimming your insoles, you can make sure that they have an exact level of fit for your shoes. Because of this, we would not recommend trimming insoles that you are planning to use across multiple pairs of shoes, as modifying them for a specific pair might prevent them from being used in another. How Do I Trim My Insoles?Trimming your insoles is a simple process and anybody should be able to do it from the comfort of his or her own home. Check out our simple, step-by-step guide to trimming your insoles to find the perfect custom fit!
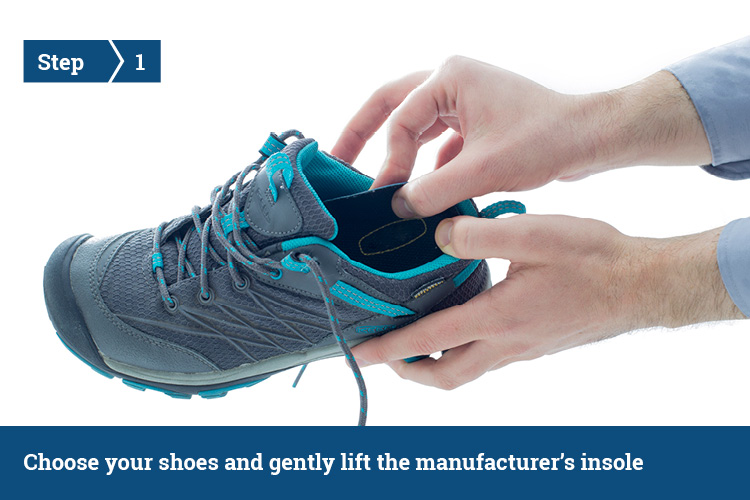
The first step in the trimming process is to select the pair of shoes that you want to use insoles with. For example, if you are buying a pair of insoles to reduce discomfort while you are running, you should choose your running shoes.
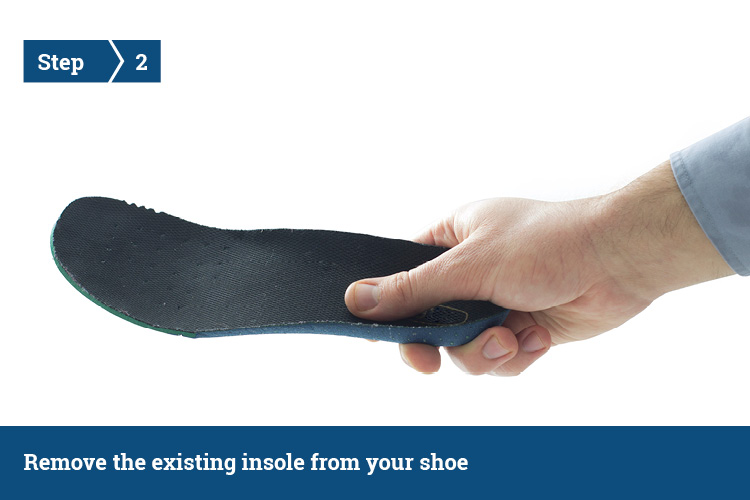
Once you have selected the right pair of shoes, you must remove the manufacturer's insole that was originally supplied with the shoe. In most cases, this can be removed from the shoes without having to use force or in any way alter your shoes. Please Note: Some shoes may feature insoles that are unsuitable for removal, being attached to the sole of the shoe. In these cases we would recommend not removing the insole as this has the potential to damage your shoes.
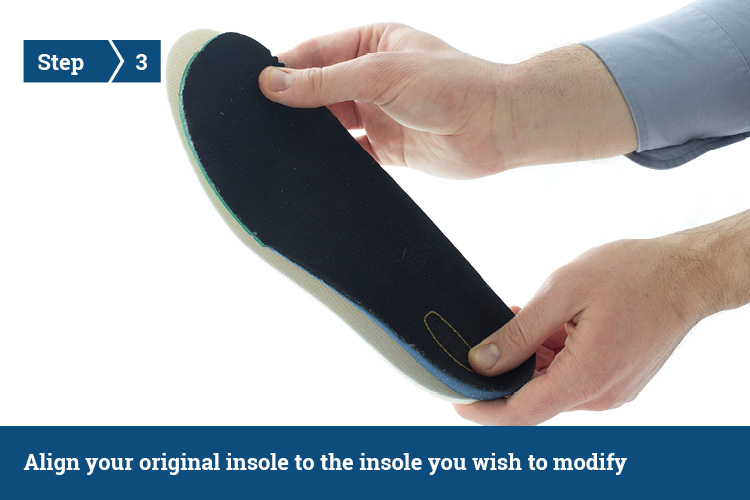
Once you have removed the original insole, you need to align it to the new insole that you wish to use. You should always align insoles from the heel – i.e. line the heels up. Many insoles feature either extra cushioning or an anatomical design to provide as the heel often needs a greater amount of support than other areas of the foot. Trimming this part of the insole can have negative effects on its efficacy.
Once your insoles are aligned, use a pen to trace around the original insole at any points where your new insole overlaps. Please note that while we have only altered the length of the insole in the interactive guide above, it is also possible to trim the sides of insoles to improve their fit.
Once you are have carefully traced around your insole, you should have a clear visual guideline of where to cut your insole. It is a good idea at this point to double check your guide to ensure that you are not taking too much off of your insole – remember, you can always trim your insoles further but you can't make them any bigger.
Now that you are sure that your guideline is correct, you can start to trim your insole. To do this, we would recommend using a sharp pair of kitchen scissors, as insoles are often made of hardwearing material that can be tough. Using sharp scissors also helps to ensure that you are getting a clean cut – better for precision and accuracy.
Your insole should now be a similar size to the one originally supplied in your shoe. Don't worry if it does not match the silhouette of the original insole exactly – it still may be suitable for your shoes.
Now that your insole is the correct shape, it can now be fitted into your shoes. Please be aware that some insoles are designed to be used instead of the manufacturer's original insole while others are designed to be used on top of the existing insole. If your insole is still not quite the right size, then you should repeat the process until the insole has a good level of fit. What's Next?Once you've trimmed your insoles down to the right size, you're ready to enjoy the best level of support and fit that the insole has to offer. Remember though – just because these insoles are now perfect for these shoes, it doesn't mean that they will be suitable for all of your shoes! Please note: Not all insoles are suitable for trimming, please refer to the manufacturer if you are in anyway unsure about the suitability of your specific insoles for trimming. |


Sign up for FREE updates & offers!The latest news and offers direct to your inbox. Just enter your email address, click 'Sign Up', an we'll take care of the rest! Secure Payments     All online payments processed securely, or pay over the phone |
thank you for your simple instructions. My innersoles now fit comfortably and I shall walk with them in tomorrow
The size 10 Pedag Keep,Warm insoles I bought were actually too small for my boots. My existing insoles are 30 cm long and your size 10 say they are 27.5-28.0 cm.
fortunately they fit my husbands size 9 shoes very well so I shall just reorder size 11.
It would be helpful to give the length of the insole as well as the size in the information given on your website.